Bathroom Vanity Project
 |
| Fig. 1.1 Vanity Drawing |
Foreword:
 |
| Fig. 1.2 Box Frame |
So I went shopping and as usual my cheap ass could not find anything that I liked for the price I wanted to pay.
I have been toying with making a concrete top and after much deliberation I decided this would be a great trial.
I looked up numerous posts and the one that was a great inspiration was this one on Pinterest
 |
| Fig. 1.3 PVC Tubing for Plumbing |
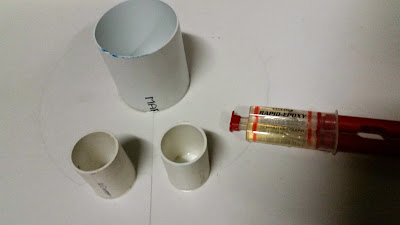 |
| Fig1.4 PVC Tubing with the Epoxy |
 |
| This is the Basin that I will be using, |
 |
| Silicone the Edges for a smooth finish between joints so the cast will have a nice face edge. |
 |
| This is the rod I found from the Local Hardware store which will provide the tensile strength for the concrete top. Even though the top is quite small and probably would have been fine with a much thinner gauge wire mesh... but I felt like overkill so.... |
 |
| I arranged the rods at 100mm spacings. Some of the recommendations were not to take the rods to close to the edge. |
 |
| I added small pieces in between the pipe fittings and holes so that it is nice and sturdy. |
 |
| Tied all the Pieces together with a thin gauged wire |
 |
| This is harder than it looks and can get quite tedious a task, i pinched my fingers a couple of times and had blood blisters to show for it.... Beer assisted as Pain Medication! |

 |
| The Whole Rod Frame needed to be lifted about 10mm off hte face board as not to have exposed rod in the form work, so extra long wire was tied around the rods to suspend the Rod Frame in mid air. |
 |
| To get the height for the clearance I used a small piece of rod as reference which I would remove before casting begins. |
 |
| No I did not buy this wonderful piece of machinery for the job, I was actually casting concrete slabs in the back yard but it comes in handy! Hired this beast for a weekend! Made easy work of the job at hand. |
 |
| Unfortunately the casting process was very involved and the pain killers distracted me a little and unfortunately I forgot the take photos of the casting process. The concrete I used was a bag of ready mix concrete from the local hardware store and I added a black pigmentation into the mix. It is a good idea to calculate the volume required before you start to ensure you are not running short halfway through the pour. The mixture had a 9mm gravel in the mix which aided in the strength. |
 |
| A very important point to remember is to add a release agent into the form work to ensure it comes loose after it has dried and set. I used spray and cook.... the wife doesn't know yet! lol |
 |
| I left the top for a good 7 days to cure really well before I touched it. I read numerous posts and some said 3 days minimum. However the cast still looked slightly wet after 3 days when I removed a single side for inspection. |
 |
| This picture does no justice, as it took me nearly 3 full days to get it to this point. After a few attempts at pouring an Epoxy coat resin on the top and failed dismally at that, I spent 2 days grinding that smooth from a very badly planned poor. Late sunday afternoon I decided stuff it and sprayed the top with a Polyurethane paint thinned to a 50/50 mix. |

 |
| A little elbow grease with a 1000 grit wet sanding paper. |

 |
| I built a Cupboard for the base I have included a few plans on Google Sketchup. |

 |
| The Plumbing fittings left from the old basin was in the perfect spot and my calculations were reasonably accurate. |


Comments